
Implementation av plugin (2 st)
Nedan är en instruktion på engelska hur ni installerar presentkortsflödet på er hemsida.
Vi styr vissa saker från vår sida och aktiverar ”pluginen” efter att vi fått en del information från er, t.ex logga och färgval. Det är också viktigt att vi vet på vilka sidor som ni lägger försäljning och inlösen av presentkort.
Se vårt demoföretag hur det kan se ut »
Saker som vi behöver från er:
Syns på presentkortet (pdf):
1. Skicka oss er logga/bild i formatet 2000 bred x 1000 hög (om ni vill ha hjälp med detta skicka oss er logga i maximal storlek.)
2. Vilken huvudfärg vill ni ha på ramen i presentkortet (blå, röd, turkos etc)?
3. E-post och Telefonnummer som kunderna kan kontakta?
Presentkortssidorna, sälj och inlösen:
4. För att aktivera sälj- och inlösen-plugin behöver vi veta på vilka sidor (urlar) ni lägger dessa, t.e.x. minhemsida.se/presentkort och minhemsida.se/presentkort-inlosen
5. Vilken färgkod vill ni ha på knapparna?
6. Inlösen: Vilket BG-nummer har ni? Ska kunderna ange OCRnr (hård eller mjuk kontroll?) eller Fakturanummer?
Följ sedan instruktionerna nedan på engelska för att synliggöra sälj och inlösen på er sida.
Efter implementation – testa gärna:
– Testa gärna flödet med köp på till exempel 2 kr (1 kr kan vara för litet för kortköp)
– Efter att loggan är inlagd får ni en pdf för presentkortet när ni gör ett köp. Förslagsvis gör ni om denna till en bild och lägger på er presentkortssida med övrig marknadsförings/informationstext. Ni kan också be oss visa en miniatyr enligt punkt 6 ovan.
I samband med att ni lanserar skickar vi er inloggning till ett admin-gränssnitt där ni kan följa försäljning och inlösen av presentkorten.
Behöver ni hjälp tveka inte att höra av er till oss på info@abouttime.se
Common implementation instruction
UPDATED INSTRUCTION – 2025-11-19
Now there is no necessity to include styles in <head> section (for css resources). It is enough to put plugin scripts at </body> on that pages where you want the plugin to be rendered and use tag <spk-plugin> for selling and <spk-plugin-activation> for activation.
—–
If it’s possible technically for you, put specific script for each plugin only on that page where you want the certain plugin to be shown.
1. Giftcard sell plugin
1.1. Put plugin js script at the end of section of page where you want sell plugin to be rendered
<script src="https://plugin.smartapresentkort.se/js/app.js" async></script>
1.2. Put sell plugin tag somewhere in the page of your site where selling form should be rendered
<spk-plugin></spk-plugin>
2. Giftcard activate plugin
2.1. Put plugin js at the end of </body> section of page where you want activate plugin to be rendered
<script src="https://activate.smartapresentkort.se/js/app.js" async></script>
2.2. Put activation (inlösen) plugin tag somewhere in the page of your site where activation form should be rendered
<spk-plugin-activation></spk-plugin-activation>
Raw example
Gift card sell plugin:
<html>
<body>
<spk-plugin></spk-plugin>
<script src="https://plugin.smartapresentkort.se/js/app.js"></script>
</body>
</html>
Gift card activate plugin:
<html>
<body>
<spk-plugin-activation></spk-plugin-activation>
<script src="https://activate.smartapresentkort.se/js/app.js"></script>
</body>
</html>
WordPress example
First approach – Use WP plugin to edit header and footer
This approach is general and it’s about putting both scripts in </body> for all pages of your site. If you have solution how to handle specific resources to </body> for each page in your WP site, use it to encapsulate each plugin assets (.js) to be included before </body> in exact certain page where you want the plugin to be rendered.
For example, WP Plugin – Head & Footer Code.
- Install Head & Footer Code Plugin in WP
- Plugins – Add new
- Activate a plugin
- Plugins – Head & Footer Code – Activate
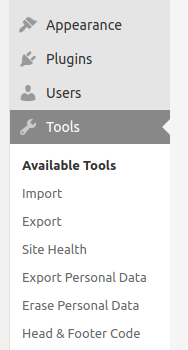
- Go to plugin page
- Tools – Head & Footer Code
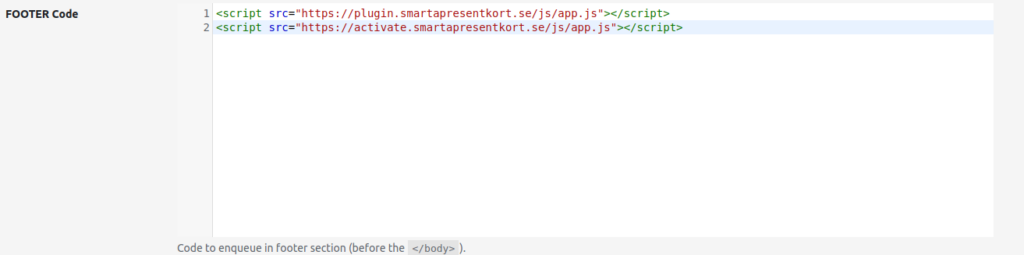
4. Put js scripts in ”FOOTER Code” section
<script src="https://plugin.smartapresentkort.se/js/app.js"></script>
<script src="https://activate.smartapresentkort.se/js/app.js"></script>
6. Create a WP page and put <spk-plugin-activation></spk-plugin-activation> as html-block there. If using text editor, then use it in text mode, not visual mode, because it’s important that <spk-plugin-activation></spk-plugin-activation> will be recognized as tag not as just a text.
Second approach – Direct edit of header.php and footer.php in Theme files
BE CAREFUL TO USE THIS APPROACH IF YOU HAVE ENABLED AUTOMATIC THEME UPDATES IN YOUR WORDPRESS.
It could update header.php and footer.php and remove Smartapresentkort plugin scripts and style links from there.
- Appearence – Theme Editor -> footer.php -> put above js links in </body> section
- Create a WP page and put <spk-plugin></spk-plugin> as a html-block there.
If using text editor then use it in text mode, not visual mode, it’s important that <spk-plugin></spk-plugin> will be recognized as tags not as just text. - Create a WP page and put <spk-plugin-activation></spk-plugin-activation> as a html-block there.
If using text editor then use it in text mode, not visual mode, it’s important that <spk-plugin-activation></spk-plugin-activation> will be recognized as tags not as just text.